Live Migrate Your Sharded Cluster to Atlas
Atlas can perform a live migration of a source sharded cluster to an Atlas sharded cluster, keeping the cluster in sync with the remote source until you cut your applications over to the Atlas cluster. Once you reach the cutover step in the following procedure, you should stop writes to the source cluster by stopping your application instances, pointing them to the Atlas cluster, and restarting them.
Restrictions
- You cannot target a Global Cluster as the destination for Live Migration.
- Live Migration does not support VPC peering or private endpoints for either the source or target cluster.
For a procedure on live migrating a replica set, see Live Migrate Your Replica Set to Atlas.
Prerequisites
Before you migrate to Atlas, upgrade the source cluster to MongoDB 4.0 or later. If the source cluster runs with authentication, specify a user to Atlas that exists on every shard and the config server replica set. The user must have permission to:
- Stop or start the sharded cluster balancer.
- Read all databases and collections on the host.
- Read the oplog on the host.
To learn more, see Pre-Migration Validation.
To help ensure a smooth data migration, your source cluster should meet all production cluster recommendations. Check the Operations Checklist and Production Notes before beginning the Live Migration process.
Migration Path
Atlas live migration supports the following migration paths:
Source Sharded Cluster MongoDB Version | Destination Sharded Cluster MongoDB Version |
|---|---|
3.6 | 3.6 |
4.0 | 4.0 |
4.2 | 4.2 |
4.4 | 4.4 |
Network Access
Configure network permissions for the following components:
Source Cluster Firewall Allows Traffic from Live Migration Server
Any firewalls for the source cluster must grant the live migration server access to the source cluster.
The Atlas Live Migration process streams data through a MongoDB-controlled application server. Atlas provides the IP ranges of the MongoDB Live Migration servers during the Live Migration process. Grant these IP ranges access to your source cluster. This allows the MongoDB Live Migration server to connect to the source clusters.
If your organization has strict network requirements and you cannot enable the required network access to MongoDB Live Migration servers, see Live Migrate a Community Deployment to Atlas.
Atlas Cluster Allows Traffic from Your Application Servers
Atlas allows connections to a cluster from hosts added to the project IP access list. Add the IP addresses or CIDR blocks of your application hosts to the project IP access list. Do this before beginning the migration procedure.
Atlas temporarily adds the IP addresses of the Atlas migration servers to the project IP access list. During the migration procedure, you can't edit or delete this entry. Atlas removes this entry once the procedure completes.
To learn how to add entries to the Atlas IP access list, see Configure IP Access List Entries.
Pre-Migration Validation
Atlas performs a number of validation checks on the source and target cluster before starting the Live Migration procedure.
The source cluster must be a sharded cluster.
If the source is replica set cluster, use Live Migration to migrate the cluster to a Atlas replica set first, then scale your cluster to a sharded cluster.
If the source is a standalone, convert the standalone to a replica set first before using Live Migration. Then scale your cluster to a sharded cluster.
- The source cluster must use CSRS (Config Server Replica Sets). See Replica Set Config Servers
- Atlas must have connectivity to the hostname and port of each node in the source cluster.
- Atlas must be able to stop and start the Sharded Cluster Balancer on the source cluster.
The source cluster has the same feature compatibility version and major MongoDB version as the target cluster. The major MongoDB verison is the first two digits of the full version, such as 4.0.x, 4.2.x, or 4.4.x.
To check the feature compatibility version of a host in the source cluster, run the following command from
mongosh:db.runCommand( { getParameter : 1, "featureCompatibilityVersion" : 1 } ) Use the setFeatureCompatibilityVersion database command to set the
featureCompatibilityVersionflag as needed.The target Atlas cluster must be a sharded cluster with the same number of shards as the source sharded cluster.
Source Cluster Security
Atlas only supports SCRAM for connecting to source clusters enforcing authentication.
If the source cluster enforces authentication, create a user with the following privileges:
- Read all databases and collections. The
readAnyDatabaserole on theadmindatabase covers this requirement. - Read the oplog.
Various built-in roles provide sufficient privileges. For example:
For source clusters running MongoDB version 3.4 or later a user must have, at a minimum, both
clusterMonitorandreadAnyDatabaseroles. For example:use admin db.createUser( { user: "mySourceUser", pwd: "mySourceP@$$word", roles: [ "clusterMonitor", "readAnyDatabase" ] } ) For source clusters running MongoDB version 3.2 a user must have, at a minimum, both
clusterManagerandreadAnyDatabaseroles, as well as read access on thelocaldatabase. This requires a custom role, which you can create with the following commands:use admin db.createRole( { role: "migrate", privileges: [ { resource: { db: "local", collection: "" }, actions: [ "find" ] } ], roles: ["readAnyDatabase", "clusterManager"] } ) db.createUser( { user: "mySourceUser", pwd: "mySourceP@$$word", roles: [ "migrate" ] } ) For source clusters running MongoDB version 2.6 or 3.0 a user must have, at a minimum, the
readAnyDatabaserole. For example:use admin db.createUser( { user: "mySourceUser", pwd: "mySourceP@$$word", roles: [ "readAnyDatabase" ] } )
Specify the user name and password to Atlas when prompted by the Live Migration procedure.
Index Key Limits
If your MongoDB deployment contains indexes with keys which exceed the
Index Key Limit, you must
set the MongoDB server parameter failIndexKeyTooLong
to false before starting the Live Migration procedure.
Modifying indexes so that they contain no oversized keys is
preferable to setting the failIndexKeyTooLong server
parameter to false. See the server manual
for strategies on dealing with oversized index keys.
failIndexKeyTooLong
was deprecated in MongoDB version 4.2 and is removed in MongoDB 4.4
and later.
Considerations
Source Cluster Balancer
Atlas Live Migration stops the sharded cluster balancer on the source cluster at the start of the procedure, and starts the balancer at the end of the procedure.
If you cancel Live Migration, Atlas restarts the balancer on the source cluster.
Under some circumstances Atlas cannot restart the balancer on the source cluster at the end of a Live Migration process. If the balancer fails to restart, the Live Migration still succeeds but a warning banner indicates that the source cluster balancer must be restarted manually.
Target Cluster Configuration
When configuring the target Atlas cluster, consider the following:
The live migration process streams data through a MongoDB-managed application server. Each server runs on infrastructure hosted in the nearest region to the source cluster. The following regions are available:
- Europe
- Frankfurt
- Ireland
- London
- Americas
- Eastern US
- Western US
- APAC
- Mumbai
- Singapore
- Sydney
- Tokyo
- Due to network latency, the live migration process may not be able to keep up with a source cluster that has an extremely heavy write load. In this situation, you can still migrate directly from the source cluster by pointing the mongomirror tool to the destination Atlas cluster.
- The live migration process may not be able to keep up with a source cluster whose write workload is greater than what can be transferred and applied to the destination cluster. You may need to scale the destination cluster up to a tier with more processing power, bandwidth or disk IO.
You cannot target a Global Cluster as the target for Live Migration.
ImportantYou cannot modify the target Atlas cluster once you start the Live Migration procedure. If you need to scale up the target cluster, first cancel the Live Migration procedure, then scale up the cluster and restart the Live Migration procedure.
Database Users and Roles
Atlas does not migrate any user or role data to the target cluster.
If the source cluster enforced authentication, you must re-create the credentials used by your applications on the target Atlas cluster. Atlas uses SCRAM for user authentication. See Configure Database Users for a tutorial on creating database users in Atlas.
Canceling Live Migration
You can cancel the process at any time by clicking Cancel. Atlas displays the Sharded Cluster Live Import in Progress message for the target cluster until the cluster is ready for normal access.
If you cancel the Live Migration procedure before completion, Atlas does not remove any data migrated up to that point. If you restart the Live Migration procedure using the same Atlas cluster as the target cluster, Atlas wipes all data from the cluster.
Testing the Target Cluster
You may want to migrate data to your target cluster, then stop the migration process and test your target cluster while leaving the source cluster running and serving data to your applications.
To test your target cluster with production data, follow the migration procedure as far as step 2. When you're ready to perform the complete migration process, skip step 2 and proceed to step 3.
Avoid Namespace Changes
Don't make any namespace changes during the migration
process, such as using the
renameCollection command
or executing an aggregation pipeline that includes the
$out aggregation stage.
Avoid Elections
The Live Migration process makes a best attempt to continue a migration during temporary network interruptions and elections on the source or target clusters. However, these events might cause the Live Migration process to fail. If the Live Migration process can't recover automatically, restart it from the beginning.
Target Cluster Network Access
During Live Migration, the mongos processes on the
target cluster are shut down and cluster connectivity via the
mongos servers is suspended. The mongos processes restart
automatically once migration is complete.
Rolling Restarts
After the migration process completes, your cluster restarts each of its members one at a time. This is called a rolling restart, and as a consequence, a failover will occur on the primary. To ensure a smooth migration, consider running a Test Failover procedure before migrating your data to the target cluster.
Migrate Your Sharded Cluster
Consider running a partial Live Migration procedure first to create a staging environment before repeating the procedure to create your production environment. The following procedure includes a callout for the appropriate time to cancel the procedure and create a staging environment.
Use the staging environment to test application behavior and performance using the latest driver version that supports the MongoDB version of the target Atlas cluster. Then, repeat the Live Migration procedure in full to transition your applications from your source cluster to the Atlas target cluster.
Avoid making changes to the source cluster configuration while the
Live Migration procedure runs, such as removing replica set members
or modifying mongod runtime settings,
such as featureCompatibilityVersion.
Pre-Migration Checklist
Before starting the import process:
- If you don't already have a destination cluster, create a new Atlas deployment and configure it as needed. For complete documentation on creating an Atlas cluster, see Create a New Cluster.
After your Atlas cluster is deployed, ensure that you can connect to it from all client hardware where your applications run. Testing your connection string helps ensure that your data migration process can complete with minimal downtime.
- Download and install
mongoshon a representative client machine, if you don't already have it. - Connect to your destination cluster using the connection string
from the Atlas UI. For more information, see
Connect via
mongosh.
Once you have verified your connectivity to your target cluster, start the import procedure.
- Download and install
Procedure
Start the migration process.
- In the left-side panel of your organization's page, click Live Migration and choose Select Cluster for General Live Migration.
Navigate to the destination Atlas cluster and click the ellipsis ... button. On the Cluster list, the ellipsis ... button appears beneath the cluster name, as shown in the following screenshot. When you view a cluster's details, the ellipsis ... appears on the right-hand side of the screen, next to the Connect and Configuration buttons.
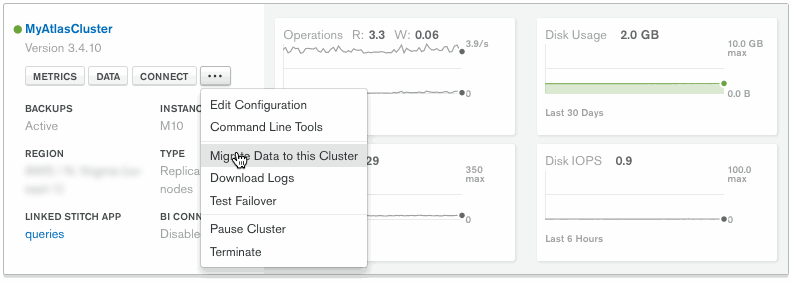
- Click Migrate Data to this Cluster.
- Atlas displays a walk-through screen with instructions on how to proceed with the live migration. Prepare the information as stated in the walk-through screen, then click I'm Ready To Migrate.
Atlas displays a walk-through screen that collects information required to connect to the source cluster.
- Atlas displays the IP address of the MongoDB application server responsible for your live migration at the top of the walk-through screen. Configure your source cluster firewall to grant access to the displayed IP address.
- Enter the hostname and port of any
mongosof the source sharded cluster into the provided text box. For example,mongos.example.net:27017. If the source cluster enforces authentication, enter a username and password into the provided text boxes.
See Source Cluster Security for guidance on the user permissions required by Atlas live migration.
- If the source cluster uses
TLS/SSL, toggle theSSLbutton. - If the source cluster uses
TLS/SSLand is not using a public Certificate Authority (CA), copy the contents of the source cluster's CA file into the provided text box.
Click Validate to confirm that Atlas can connect to the source cluster.
If validation fails, check that:
- You have granted the Live Migration servers network access on your source cluster firewall.
- The provided user credentials, if any, exist on the source cluster and have the required permissions.
- The SSL toggle is enabled only if the source cluster requires it.
- The CA file provided, if any, is valid and correct.
- The provided hostnames are valid and reachable over the public internet.
Click Start Migration to start the migration process.
Atlas displays the live migration progress in the UI. During live migration, you cannot view metrics or access data for the destination cluster.
A lag time value is displayed during the final oplog tailing phase that represents the current lag between the source and destination clusters. This lag time may fluctuate depending on the rate of oplog generation on the source, but should decrease over time as oplog entries are copied to the destination.
Click View Progress per Shard to view the sync progress and migration time remaining per shard. If the initial sync process for a given shard fails, you can try to restart the sync by clicking Restart.
When the lag timer and the Prepare to Cutover button turn green, proceed to the next step.
(Optional) Test the destination cluster.
Optional. If you wish to skip testing and complete the migration, proceed to step 3.
If you wish to do a dry run of the migration process and test the destination cluster for performance and data integrity, you may optionally click the Cancel button at this point. The source cluster stops syncing data with the destination cluster, but all the transferred data remains, so you can test your applications with the new cluster.
When your testing is complete and you're ready to perform the complete migration process, begin again from step 1. All the databases and collections which were created during the test run will be deleted and rebuilt.
Perform the cutover.
When Atlas detects that the source and destination clusters are nearly in sync, it starts an extendable 72 hour timer to begin the cutover procedure. If the 72 hour period passes, Atlas stops synchronizing with the source cluster. You can extend the time remaining by 24 hours by clicking the Extend time hyperlink below the <time> left to cut over timer.
The cutover procedure requires stopping your application and all writes to the source cluster. Consider scheduling and announcing a maintenance period to minimize interruption of service on the dependent applications.
- Once you are prepared to cut your applications over to the destination Atlas cluster, click Prepare to Cutover.
Atlas displays a walk-through screen with instructions on how to proceed with the cutover. The optime gap displays how far behind the destination cluster is compared to the source cluster. You must stop your application and all writes to the source cluster to allow the destination cluster to close the optime gap.
Perform the steps described in the walk-through screen to cut over your applications to the Atlas cluster. The walk-through screen provides the cluster connection string your applications must use to connect to the Atlas cluster.
NoteStaging MigrationIf you are creating a staging environment for the purpose of testing your applications against, note the optime gap to identify how far behind your staging environment will be compared to your source cluster.
Press Cancel to cancel the live migration. Atlas terminates the migration at that point in time, leaving any migrated data in place. Atlas displays the Sharded Cluster Live Import in Progress message for the destination cluster until the cluster is ready for normal access. See Canceling Live Migration for more information on cancelling a live migration procedure.
Once the cancellation complete, you can test your staging application against the partially migrated data.
Click Cut Over when you have completed the cutover sequence and updated your applications to point at the service cluster. The optime gap must be
0:00before you can complete the procedure.Atlas automatically prepares the Atlas cluster once you complete the cutover sequence. During this time, you cannot access the Atlas cluster. Atlas displays the status of the cluster configuration in the UI.
Once Atlas displays the cluster as active and ready, you can point your applications at the Atlas cluster and begin performing write operaitons.
ImportantWrite operations issued to the source cluster after the cutover sequence are not mirrored to the destination Atlas cluster. Double check that your applications are pointed at the new Atlas cluster before restarting them.
Migration Support
If you have any questions regarding migration support beyond what is covered in this documentation, or if you encounter an error during migration, please request support through the Atlas UI.
To file a support ticket:
- Click Support in the left-hand navigation.
- Click Request Support.
- For Issue Category, select
Help with live migration. - For Priority, select the appropriate priority. For
questions, please select
Medium Priority. If there was a failure in migration, please selectHigh Priority. - For Request Summary, please include
Live Migrationin your summary. - For More details, please include any other relevant details to your question or migration error.
- Click the Request Support button to submit the form.